|
|
|
|
|
|
|
|
|
|
CRecorder
|
|
|
|
|
|
1.User's Manual
|
|
Please click here to download user guide
|
|
Down Product Video
|
|
Down Software Demo
|
|
Top
|
|
|
|
2.Software Install Procedure
|
|
|
After running the set-up program, you should now have an icon on your desktop for the CRecorder. Double clicking on this icon will launch the program.
|
|
Restart your computer after the installation procedure finished.
|
|
Then when you connect the CRecorder to your PC, there will be prompts:
|
|
1).
|
New hardware found;
|
|
2).
|
Installing driver;
|
|
3).
|
Driver installed successfully and comes to use.
|
|
The CRecorder's client software will work on all Windows 2000, NT, ME, XP, and Vista versions.
|
|
|
Top
|
|
|
3.Connect CRecorder to the car
|
|

|
|
Insert CRecorder to 16PIN diagnostic connector. It can communicate with ECU automatically when the ignition is turned on. After communication successfully, it begins to record data from the ECU.After inserting CRecorder to DLC, turn on the ignition switch within one minute; If LED light flashes regularly, it indicates that communication is successful; If LED light is illuminated continuously, it indicates that is not compatible with this vehicle.
|
|
Top
|
|
|
4.Indicators Explanations
|
|
|
1).
|
Communication interrupt status
|
|
|
If it's the first time to connect CRecorder into DLC, power it. CRecorder will try to communicate with ECU in PWM、VPW、CAN、KWP2000、ISO、KWP5BPS modes in sequence within three minutes. If communication successful, CRecorder will store vehicle mode.
|
|
2).
|
System entry failure status instructions
|
|
|
When CRecorder is powered into DLC at the first time, if CRecorder can't communicate with vehicle within three circles, CRecorder will light steady on to indicate that CRecorder doesn't support this car.
|
|
3).
|
Normal communication status instructions
|
|
|
LED flashing in certain frequency indicates that CRecorder is communicating with ECU.
|
|
4).
|
Communication off-line status instructions
|
|
|
During normal communication procedures, if CRecorder break up communication with ECU one time, it caused off-line. So CRecorder will try to communicate with ECU five times, and LED will light and extinguish five times.
|
|
5).
|
Entry STANDBY mode instructions
|
|
|
During off-line status procedures, if CRecorder can’t succeed in communicating with ECU, it will enter STANDBY mode, and then LED extinguishes. In this mode, CRecorder will try to communicate with ECU every 10 seconds and check vehicle battery voltage at the same time.
|
|
6).
|
Entry SLEEP mode
|
|
|
In STANDBY mode, if vehicle battery voltage is checked out to be too low, it will enter SLEEP mode to save battery.
|
|
7).
|
SLEEP mode wake-up
|
|
|
In SLEEP mode, if vehicle battery voltage become normal again, CRecorder will be waken up automatically. LED will flash at 0.33HZ frequency. CRecorder will try to communicate with ECU with memory communication mode. If communication successful, it starts to record a new TRIP.
|
|
8).
|
FLASH memory full status instructions
|
|
|
If TRIP recodes FLASH fully, LED will light 0.5s, and extinguish 1s. It indicates that TRIP is filled with FLASH.
|
|
|
Top
|
|
|
5.Remove CRecorder from the car
|
|
Only remove CRecorder after switching the ignition switch off and wait for the LED to extinguish.
|
|
Top
|
|
|
|
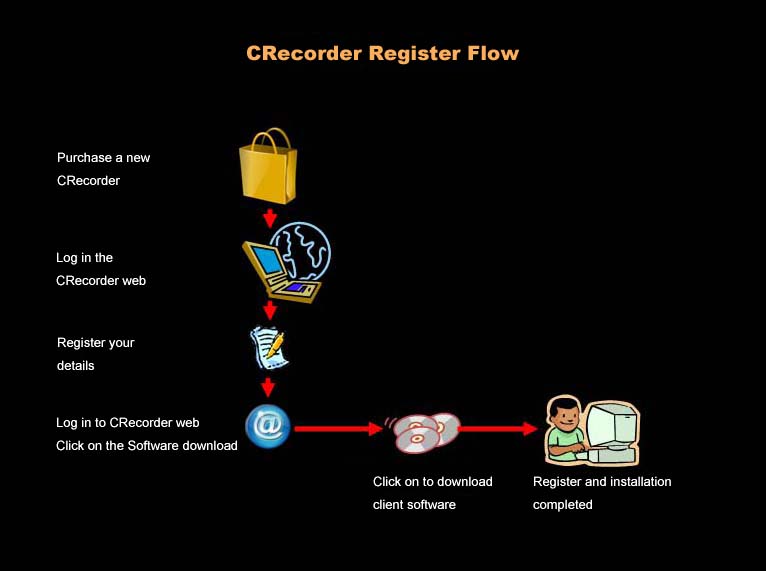
6.Register Flow
|
|
|
|
Top
|
|
|
|
|
|
|
OBDBook
|
|
1.
User's Manual
|
|
|
2.
Steps for driver installation
|
|
|
|
3.Connection between OBD Book and tested vehicle:
|
|
|
a).
|
Turn the ignition off.
|
|
b).
|
Locate the 16PIN DLC on the vehicle.
|
|
c).
|
Insert the OBDII cable to the vehicle’s DLC.
|
|
d).
|
Turn the ignition on (Engine can be idle or run).
|
|
|
|
|
4. Software installation:
|
|
|
a).
|
Log on www.crecorder.com, download the
OBDBOOK_driver_Win2K_XP.zip
and latest version of OBDBook Upgrade-package and then unzip / install it to the local disk (Please refer to OBDBook User’s Manual).
|
|
|
b).
|
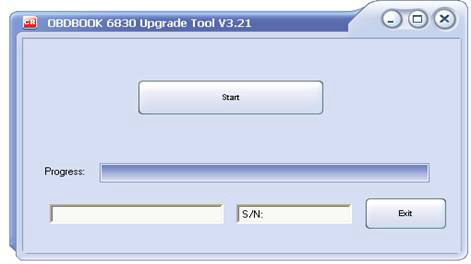
Connect the OBDBook into computer through USB cable; open the OBDBook Upgrade tool “LAUNCH”.
The following box will appear:
|
|
|
|
|
|
|
Click “Start” to begin the Upgrade process, it will also show the OBDBook serial no. and Upgrade information.
|
|
|
|
Note: Upgrading process will take 40-45 minutes (DTC 1-22)
|
|
|
|
Click “OK” when a message Upgrade Successfully pops out; unplug USB cable and Upgrading ends.
|
|
|
Top
|
|
|
|
|
|
|
CReader V
|
|
1.
User's Manual
|
|
|
|
2.Connection between CreaderV and tested vehicle:
|
|
|
a).
|
Turn the ignition off.
|
|
b).
|
Locate the 16PIN DLC on the vehicle.
|
|
c).
|
Insert the OBDII cable to the vehicle’s DLC.
|
|
d).
|
Turn the ignition on (Engine can be idle or run).
|
|
|
|
3. Software installation:
|
|
|
a).
|
Log on www.crecorder.com, download the
CreaderV_driver_Win2K_XP
and latest version of CreaderV Upgrade-package and then unzip/install it to the local disk (Please refer to CreaderV User’s Manual).
|
|
|
b).
|
Connect the CreaderV into computer through USB cable; open the CreaderV Upgrade tool “LAUNCH”.
The following box will appear:
|
|
|

|
|
|
|
Click “Start” to begin the Upgrade process, it will also show the CreaderV serial no. and Upgrade information.
|
|
|
|
Note: Upgrading process will take 40-45 minutes (DTC 1-22)
|
|
|
|
Click “OK” when a message Upgrade Successfully pops out; unplug USB cable and Upgrading ends.
|
|
|
Top
|